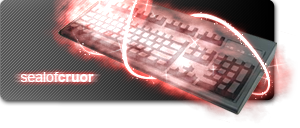
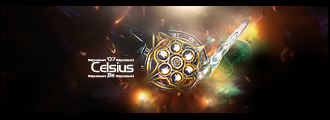
My New Sig

Digital art design, renderings, signatures and anything art related. Upload pictures of your newest work or ask for feedback. Post graphics requests or discuss art in general.
Post Reply
User avatar
Cruor
Loyal Member
Posts: 1999
Joined: Wed Apr 12, 2006 1:22 am
Quick Reply: Yes
Location: Off topic

My New Sig

Post by Cruor »

Image
Thoughts?

(Yes I used a lens flare, but it's justified since it's a Sun glow right? :P)

Edit: Sparkles defined, scanlines weakened, light thread glow fixed.
Last edited by Cruor on Sun Sep 16, 2007 1:46 pm, edited 3 times in total.
Image

User avatar
Rizla
Ex-Staff
Posts: 1197
Joined: Sun Jun 11, 2006 4:17 am
Quick Reply: Yes
Location: Artist's Corner

Post by Rizla »

sexy, very fitting, only suggestion is some more defined twinkles in the glowy area to achieve a more accurate representation of seals.

edit nevermind just looked at a sosun glaive :) looks dead on Cruor.

edit again not quite dead on your flowy lines are a tad too bold, just knitpicking.
Last edited by Rizla on Sun Sep 16, 2007 1:34 pm, edited 2 times in total.
Image

User avatar
dom
Global Moderator
Global Moderator
Posts: 9962
Joined: Wed Mar 08, 2006 10:46 pm
Quick Reply: Yes
Location: västkustskt

Post by dom »

I would like it much better if you would of turned down the opacity on the diagonal lines.
Image

User avatar
Rizla
Ex-Staff
Posts: 1197
Joined: Sun Jun 11, 2006 4:17 am
Quick Reply: Yes
Location: Artist's Corner

Post by Rizla »

dom wrote:I would like it much better if you would of turned down the opacity on the diagonal lines.


no way dude cause when i scroll up and down the refresh on the monitor makes em animate and flicker...too cool.
Image

User avatar
Cruor
Loyal Member
Posts: 1999
Joined: Wed Apr 12, 2006 1:22 am
Quick Reply: Yes
Location: Off topic

Post by Cruor »

I'm sitting on the fence with the scanlines because I like how they show through the mist with high opacity but I can see how they cause problems with your display.

As for the threads of light, thanks for reminding me. They are thick because I put a white glow on my stroked path and forgot to change it to red.
Image

User avatar
[SD]Kratos
Senior Member
Posts: 4785
Joined: Mon Apr 24, 2006 9:48 am
Quick Reply: Yes
Location: Venus

Post by [SD]Kratos »

:shock:

It's the smex!
Image

Luoma
Veteran Member
Posts: 3895
Joined: Thu Sep 14, 2006 8:23 am
Quick Reply: Yes
Location: Artists Corner & Aege

Post by Luoma »

Ahaha! awsome :D
<<banned from SRF for proof of botting. -SG>>

Snudge
Senior Member
Posts: 4200
Joined: Sun Jun 11, 2006 8:20 pm
Quick Reply: Yes
Location: Artist Corner
Contact:

Post by Snudge »

That sig is the sexual intercourse... oO
<<banned from SRF for proof of botting. -SG>>

User avatar
MasterKojito
Ex-Staff
Posts: 1923
Joined: Mon Apr 30, 2007 6:16 am
Quick Reply: Yes
Location: November the 15th

Post by MasterKojito »

Nice, 10.10 :shock:
Image

User avatar
aazumak
Active Member
Posts: 918
Joined: Sat Jun 09, 2007 12:56 pm
Quick Reply: Yes
Location: Artist Corner
Contact:

Post by aazumak »

i love the concept and you pulled it off wonderfully, just needs a background, or make it be transparent
Image
Image
_____________________!!!!!!Rogue 7X !!!!!!
Image

User avatar
Meow
Loyal Member
Posts: 1872
Joined: Fri Mar 16, 2007 3:25 am
Quick Reply: Yes
Location: Venice

Post by Meow »

Wow, it looks frickin cool :)
Image
Thanks deep.in for the cute sig! :)
Chinese-[LaDyX | 7X | STR nuker | Godlike_]

User avatar
wildwolf111
Common Member
Posts: 138
Joined: Tue Nov 14, 2006 6:17 am
Quick Reply: Yes
Location: Earth (Not Moon or Mars or...)

Post by wildwolf111 »

Are those from Razer? The mouse and the keyboard looks exactly the same as mine.

User avatar
Peety
Common Member
Posts: 109
Joined: Thu Sep 06, 2007 1:40 am
Quick Reply: Yes
Location: Tibet

Post by Peety »

yeah its the razer mouse...not sure about the keyboard (i use a g15).
Image
Image
Image Blacklisted _ENDLESS_
bongOz
5x FS Glaiver

User avatar
Cruor
Loyal Member
Posts: 1999
Joined: Wed Apr 12, 2006 1:22 am
Quick Reply: Yes
Location: Off topic

Post by Cruor »

The mouse is a Razer Copperhead, and the keyboard is a Das Keyboard, although I actually use a KeyTronic E03600 (same model as the Das Keyboard, way lower price) with the key markings filed off.
Image

User avatar
-Evan
Frequent Member
Posts: 1415
Joined: Sat Aug 04, 2007 5:43 am
Quick Reply: Yes
Location: Off-Topic

Post by -Evan »

Darn... My photoshop skills can't duplicate that fiery sox effect... Can you make tut for those who aren't blessed with talent...

My Attempt:

Image


Failed.
hurr durr

User avatar
Cruor
Loyal Member
Posts: 1999
Joined: Wed Apr 12, 2006 1:22 am
Quick Reply: Yes
Location: Off topic

Post by Cruor »

Here goes...

Well, the effect has 9 layers, including the object you are adding the seal to.

Their structure is like this:
[Group]<Linear Dodge (Add)>
Gradient Map <Normal>
Lens Flare <Screen>
Sparkles <Normal>
Particles <Normal>
Threads <Normal>
Mist <Normal>
[/Group]
Object <Normal>
[Group] <Lighten>
Gradient Map <Normal>
Mist <Normal>
[/Group]

For the mist layer of the first group, take this smoke texture which is the one used ingame:
Image

Paste copies of it over each other, using the screen blending mode, until you have enough area covered for your object. Then randomly rotate each copy to make the texture random and merge the layers together. Next use the transform tool to skew, rotate and scale your smoke until it lies on the same plane as your object. Finally, make a quick mask on the layer by simply using the layer contents. Put it into a new group above your object in the layer stack, and use the Linear Dodge blending mode for the group.

Next you need to make the threads of light. They typically weave around the object in a double-helix arrangement. To make them, make a new layer above the Mist layer, take the pen tool and make a couple of curvy paths that zig-zag across your object. Now change to your brush tool and make the brush white, around 3px wide, larger if your object is bigger, and give it 100% hardness. Open up the brushes palette and click on Shape Dynamics. Turn Size Jitter all the way down to 0% and make sure the Control dropdown is set to Pen Pressure. Now switch back to your pen tool and for each path you made, select it and right click then click on Stroke Path making sure Simulate Pressure is checked and click OK. That should give you nice tapered lines. Now make a selection around your object and go in with the eraser to remove parts of the threads which should be behind your object.

Now you can add the particles which surround the threads. Make a new layer, and go back to your brush tool. Change the size to be around 2px (larger if your threads are larger) then open up the brushes palette again. Under Shape Dynamics, max Size Jitter. Under Scattering, Set Scatter to around 350% or more depending on your thread size. Now go to your pen tool and like before, select each path then stroke it using your scattering brush. Now just erase the particles which should be hidden, you can probably go without a selection around your object.

The next layer is your sparkles. for these, just find a nice sparkle brush (I used the one from the default Assorted Brushes set), and in the brushes palette under Shape Dynamics give it 100% Size Jitter and Angle Jitter. Now put sparkles wherever you see fit. You can play with the opacity a bit depending on how visible you want them to be.

The final layer in this group is the lens flare which isn't so visible in my sig. To make it, make a new layer filled with black and go to Filter->Render->Lens Flare, the default settings are fine. Desaturate the layer to take away the lens flare's color then make a quick mask using the layer contents and play around with the brightness and contrast of that until you are happy with how it looks.

Now you need to make the second layer of mist underneath your object. Make a new group underneath the object, setting its blending mode to lighten. Now follow the same process you used to make the mist above to make a new mist texture (don't just copy and paste the one you made before). Once you have that layer finished, you are done with the hard part.

The final step is adding color to your seal. Start off by changing to your object's layer, and apply a photo filter with whatever color seal you want in order to get rid of any opposing tones. Now go to the top group and place a gradient map in the top of the group. The gradient map should go from black at 0% to your seal's color at 50% to white at 100%. Save it as a new gradient for later use. Change to your threads layer and go into blending options. Add an Outer Glow, the default settings should be fine, using your seal's color. Next go to the bottom group and add another gradient map in the top of the group, using the same gradient as before.

You may need to clean up your quick masks but other than that you should have a seal glow effect that looks quite similar to mine. If you want a moon glow, omit the mist. If you want a star glow, omit the threads. I hope all this wasn't too confusing.
Image

User avatar
-Evan
Frequent Member
Posts: 1415
Joined: Sat Aug 04, 2007 5:43 am
Quick Reply: Yes
Location: Off-Topic

Post by -Evan »

Thanks for typing all out, I'll try it again when i get back to school.
hurr durr

User avatar
Xyzzzy
Addicted Member
Posts: 2629
Joined: Sun May 20, 2007 10:20 pm
Quick Reply: Yes
Location: Off Topic
Contact:

Post by Xyzzzy »

Cruor wrote:[amazingness]

holy shit


write a book why don't you?
XemnasXD wrote:also im not going to stop calling him a cosmic douche, anyone that knows everything about everything, then creates you knowing full you won't end up following the rules he's made up for you, then punishes you for all eternity for it....come on...thats just being a d*ck.

Post Reply

Return to “Artists Corner”