WELCOME

One of the best things I like about SRF's Artist Corner is the diversity of its regular members. Unlike most forums that aren't dedicated to graphic design or art in general, the work of our artists here are not simply limited to anime/game "sigs" or "tags"; our collection range anywhere from signature making, to drawing, to photography, and everything else in between. Although I'm not certain how many of you are actually interested in photography, it would be at least safe to assume that a large number of people here find some fascination when looking through galleries filled with wonderful photographs, both black & white and in color. Whether you already have, you are planning to, or you're reluctant to pick up a camera and start "shooting," I want to create a small thread where people can learn from one another about photography - both basics and advanced information. I hope that by the end of the day, people here can realize that the art of recording light is a lot more than just pushing a camera button.
Let's begin with the basics:
1. Shutter Speed
photgraphy.about.com wrote:One of the most requested photography tips is shutter speed help. Shutter speed is one of the most basic important controls on a camera. Shutter speed controls the amount of time that your film, or digital sensor, is exposed to light. In effect, the shutter determines what image is captured on your film. The shutter is a small plastic sheet that opens and closes to allow light onto the film or prevent light from reaching the film. The shutter is opened when you press the shutter release button on your camera to take a picture. The shutter speed determines how long the shutter remains open.
Spoiler!


The term 'shutter speed' is a pretty self-explanatory term. In most digital SLRs, like the Canon EOS series, the mode that gives you full control of this function is displayed as Tv (Time Value). This setting will allow you to manipulate the amount of time you wish to expose the camera's sensor to light while the rest is automatically regulated by it. If you are new to photography and recently got yourself a dSLR, this is a good place to start. Although it sounds simple, regulating this function can make the difference between being able to capture a moment correctly or missing out on it altogether.
This setting is also responsible for capturing the subject's movement. Shutter speed is measured in numbers - whole, mixed, and fraction. Shooting a moving subject, for example a moving car, at a speed of 1 second (displayed as 1") will result in a completely blurry image - at least that of the vehicle. This is because the sensor/film is exposed for a whole second, which is enough time for the car to move a couple of feet from the time the shutter opened to the moment it closed. On the other hand, taking a picture of the same vehicle at 1/300th of a second (displayed as 300) or higher will record it in the picture as a still subject with most of its details intact. This is the same idea behind photos of people "suspended" or "frozen" in mid-air during a jump or fall.
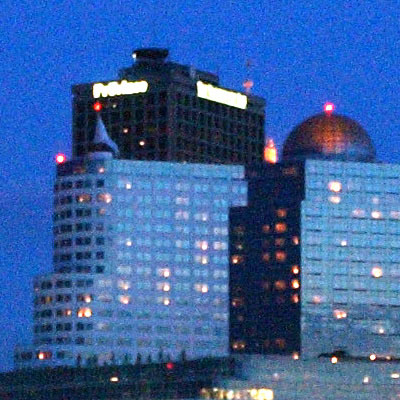
However, this does not mean that shooting images for 1 second or longer is completely useless. Perhaps you want to take an image of a non-moving object in the middle of a moving crowd? Setting the camera to shoot for 3 seconds would record the moving people in a blurry state - this is called "motion blur." It will reduce the number of distractions in order to place the focus on the main object you wanted to photograph. Of course, there are other ways and factors that affects blurring of images but we'll get to those later. Another setting where you would benefit from long exposure would be night time and fireworks photography. Since the amount of light at night is very limited, prolonging the exposure would allow you to capture more details of a city skyline after dark. As for fireworks, unless you wish to take a picture of several "dots" of light, it would be necessary to set the shutter speed for a couple of seconds in order to record motion - which would look more like the lines of lights we normally see in pictures of July 4th celebrations and New Year's Eve parties.
2. Aperture
Spoiler!


Aperture, in my opinion, is one of the more challenging aspects of photography basics. Shutter speed affects the duration/time in which light touches the film/sensor. On the other hand, aperture affects the amount of light that enters the camera. The most popular analogy for this is the pupil or hole in your eye where light enters - when the pupil opens up or dilates, more light passes through. On the contrary, when the size of the pupil becomes more narrow or constricts, less light is allowed in. Aperture is measured in "f/ stops." A lower f/ stop number means a wider aperture, and a higher number, of course, would be more narrow. For the sake of keeping things simple, I really want to avoid going into detail about that but just know this basic information for now. I understand that most of you get the concept but one question still remains: "How does that affect the photograph?" This is when depth of field (DOF) comes in.
Depth of field can be described as the amount of space in the field in front of the camera that is in focus. It determines how much of it would appear as sharp and detailed and how much of it would be blurry (and how blurry they are). Imagine you're in a straight narrow hallway and there's 3 items in front of you: 1 item is placed 5 feet away, the next one is 10 feet away, and the other one is 15 feet away. Now picture an imaginary block about 3 feet thick - that is your depth of field. Anything that's inside this imaginary block will appear detailed, and anything that is not will be blurred. As the aperture becomes wider (lower number - bigger hole), the thickness of the imaginary block becomes smaller and vice versa. You will adjust the placement or distance of the imaginary block from you using the focus ring. So if that block, which is 3 feet wide, focuses on the 2nd item (10 feet away), it then becomes focused while the other 2 items will appear blurred. That is aperture in a nutshell.
For a "slightly" more detailed explanation of f/ stops: CLICK
3. ISO (ASA)
Spoiler!


ISO (International Organization for Standardization) or ASA (American Standards Association) are interchangeable terms for defining film sensitivity to light or in digital, sensor speed. There's a slight difference between the two but they are pretty much the same; for the sake of simplicity, most photographers just view them as being completely similar. For this section, I will be referring to it as "ISO" just to avoid being too repetitive and to keep the dialogue to a minimum. The main thing you have to remember in ISO, both in film and digital, is that the higher the ISO number, the less light you need to capture an image - that means that the film/sensor has a higher sensitivity to light. This knowledge is very useful for shooting in places where natural light (the sun) is not available or the place simply has inadequate light. So now all you have to do when light is too dim is to hit that ISO number all the way to 1600 or higher to get all the details right? Sorry, but no.
As our common intuition would tell us, there's always a catch. Ever wonder where all that dust comes from in a lot of black & white photographs? That is called film grain. And of course, there's also a digital equivalent for film grain - it's called noise. Although I find film grain to have some form of an artistic quality (especially in B/W), most people find digital noise to be quite irritating; they appear as tiny red, blue, and green dots and streaks/lines scattered across the image - yuck!
In order to minimize grain/noise, it would be highly advisable to shoot with low ISO. Preferably anywhere between 100-800 for digital and 400 for film. There are numerous programs available to reduce digital noise, including Photoshop, but they can only do so much and they cause some damage to the quality of the photo. Therefore, it would in your best interest to get it right the first time.
4. Light Meter and Exposure
Spoiler!


photography.about.com wrote:A light meter is an instrument inside your camera that tells you if the amount of light reaching the film will be enough or too much to properly expose your image. The light meter takes into account your shutter speed, film speed, and aperture settings.
Assuming that you've read through Shutter Speed, Aperture, and Film Speed (ISO/ASA) and understood the concept behind them, it's time to put all that knowledge together and start shooting manual! Setting these three factors will determine the amount of light that goes into your camera and how it is recorded either via film or digital sensor. How do you know if the exposure is at your desired level? There's a tool for that - it's called a light meter. The light meter is usually a built-in device in most "professional" cameras such as SLRs (Single Lens Reflex). The light meter helps you determine whether the photo you're about to take is either underexposed, overexposed, or correctly exposed.
The two ends, usually marked by either a positive/negative symbol (+/-) or a number (-2/+2), represents the exposure level; negative/-2 being completely underexposed and vice versa (therefore, the middle (0) is "correct exposure.")
Although it sounds like a very handy tool, you have to keep in mind that it is only there to assist you - not to lead. There's a couple of things you have to remember about the light meter:
First of all, the light meter responds to the amount of light located at and around the center of the view finder. Which means that if you're taking an outdoor picture, for example a city skyline, and your camera is pointed at the building, the resulting photograph will show the sky as overexposed and full of blown-out highlights. Pointing the camera at the sky and setting a correct exposure for it will result in the buildings being underexposed. This is when your artistic skills come in play - you have to determine a balance between the two (there's always a way to fix that later on but that will be discussed in a different topic.)
Next, you have to remember your three basics - duration of exposure (motion control), depth of field, and film speed. The exposure is simply a combination of these three factors - therefore, even though the level of exposure is the same, the method of recording the photo and its effects on the final product will be different. Different scenes require different priorities. You have to understand that all three factors compensate for each other in order to determine the correct exposure; for example, exposing the film for 1" (1 second) at f/22 will show the same exposure level as taking it for 1/125 of a second at f/8. However, based on your knowledge of aperture and shutter speed, you know for sure that the result will be very different. Rule-of-thumb: If focus is a moving subject, prioritize shutter speed. If you're focus is a still object, prioritize aperture (DOF). If it's a combination of both, that really depends on how you want your photo to appear.
Here's a small guideline on what factor to prioritize depending on what picture you're taking:
photography.about.com wrote: Is Motion Control(MC) or Depth of Field (DOF) More Important?
* Landscapes - DOF
* Sports - MC
* Posed Portraits - DOF
* Nature Photography - DOF & MC
* Photojournalism - DOF & MC
* Architecture - DOF
 That's all for now, folks!
Spoiler!
[Please let me know if you see anything that needs to be corrected or improved in both content information and grammar/spelling. All written content, except from quoted material, was written by me and is exclusively for www.silkroadforums.com only. If you wish to share this information to anyone, please send them a link; do not copy-paste and claim it as your own. Thank you for respecting my work.]
If you wish to contribute or request information regarding a certain topic, please do not hesitate to ask. It would also be pretty interesting to have other people with knowledge about photography to contribute to this. Hopefully if it draws enough attention, it'll get a sticky.